
The Linux HA cluster for RedHat and CentOS 7 is very different from the one for the previous versions. It is based on projects very popular opensource as pacemaker and corosync. All operations on the cluster, including installation and configuration, resource management and administrative tasks are made using one command as root, pcs (pacemaker configuration system).
HA Cluster Basics
A cluster is two or more computers (called nodes or members) that work together to perform a task. There are four major types of clusters:
- High availability
- Storage
- Load balancing
- High performance
High availability (HA) clusters provide highly available services by eliminating single points of failure and by failing over services from one cluster node to another in case a node becomes inoperative. A high availability cluster must maintain data integrity as one cluster node takes over control of a service from another cluster node. Node failures in a high availability cluster are not visible from clients outside the cluster. The RedHat Enterprise Linjux High Availability Add-On provides high availability clustering through its High Availability Service Management component, Pacemaker.
The cluster infrastructure performs the following functions: Cluster management, Lock management, Fencing, Cluster configuration management.
Quorum
In order to maintain cluster integrity and availability, cluster systems use a concept known as quorum to prevent data corruption and loss. A cluster has quorum when more than half of the cluster nodes are online. To mitigate the chance of data corruption due to failure, Pacemaker by default stops all resources if the cluster does not have quorum. Quorum is established using a voting system. When a cluster node does not function as it should or loses communication with the rest of the cluster, the majority working nodes can vote to isolate and, if needed, fence the node for servicing.
Fencing
In a cluster system, there can be many nodes working on several pieces of vital production data. Nodes in a busy, multi-node cluster could begin to act erratically or become unavailable, prompting action by administrators. The problems caused by errant cluster nodes can be mitigated by establishing a fencing policy. Fencing is the disconnection of a node from the cluster's shared storage. Fencing cuts off I/O from shared storage, thus ensuring data integrity. The cluster infrastructure performs fencing through the STONITH facility.
STONITH
Shoot the Other Node in the Head (STONITH) acts as a cluster resource in Pacemaker that processes fence requests, forcefully powering down nodes and removing them from the cluster to ensure data integrity. It's often deployed in conjunction with a power switch, or an integrated remote management board, or others fence devices, managed by fence agents.
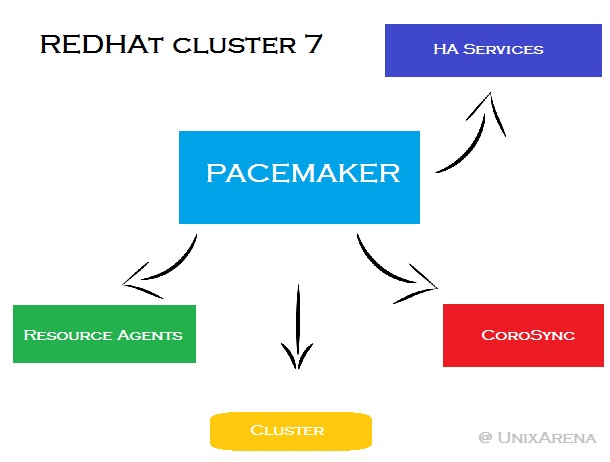
Redhat Cluster Core Components:
-
Resource Manager - Pacemaker provides the brain that processes and reacts to events regarding the cluster (nodes joining or leaving, failures, maintenance and scheduled activities). Pacemaker reacts moving resources, stopping nodes and even forcing shutdown.
-
Low-level infrastructure - Corosync provide reliable messaging, membership and quorum information about the cluster.
-
Resource Agents - Resource agents (RA) are nothing but a scripts that start, stop and monitor them.
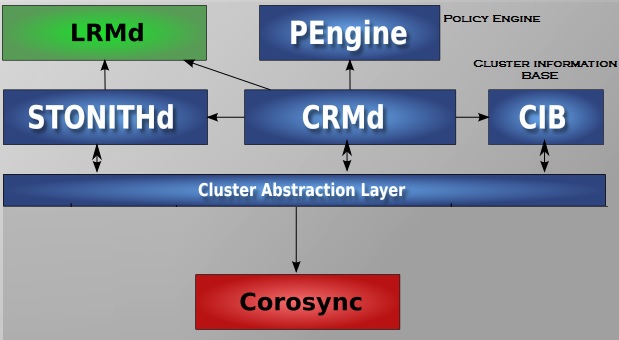
Pacemaker’s key components:
-
Cluster Information Base (CIB) It uses XML format file (cib.xml) to represent the cluster configuration and current state of cluster to all the nodes. This file be kept in sync across all the nodes and it's used by PEngine to compute ideal state of the cluster and how it should be achieved.
-
Cluster Configuration Management (PCSd). The pcsd service manage the configuration of the cluster in CIB, and receives commands by cli and gui tools.
-
Cluster Resource Management daemon (CRMd) List of instruction will feed to the Designated Controller (DC).Pacemaker centralizes all cluster decision making by electing one of the CRMd instances to act as a master. If one CRMd instance fails, automatically new one will establish.
-
Local Resource Management daemon (LRMd) LRMd is responsible to hear the instruction from PEngine.
-
Policy Engine (PEngine or PE) PEngine uses the CIB XML file to determine the cluster state and recalculate the ideal cluster state based on the unexpected results.
-
Fencing daemon (STONITHd) If any node misbehaves , it better to turned off instead of corrupting the data on shared storage. STONITH offers fencing mechanism in RHEL 7. STONITH is configured in CIB and can be monitored as a normal cluster resource.
Config files:
/etc/corosync/corosync.conf -  membership and quorum configuration

/var/lib/pacemaker/crm/cib.xml - cluster node and resource configuration.
Log files:
/var/log/pacemaker.log

/var/log/cluster/corosync.log

/var/log/pcsd/pcsd.log

/var/log/messages   (look for pengine, crmd, ...)
Resources and Groups
A cluster resource is anything that is managed by the cluster. There are different types of resource:
-
Primitive ⇒ It is a singular resource that can be managed by the cluster. That is the resource can be started only once (es.VIP address)
-
Clone ⇒ resource that should be running on multiple nodes in the same time
-
MultiStake (aka master/slave) ⇒ resource where one instance master and the other instance slave, cluster manages master and slave status (es. DRBD )
-
Group ⇒ A group of primitive (or clone). A resource group is a convenient way of keeping resources together. Resources in a group are always kept together on the same node, and they will also be started in the order in which they are listed in the group.
There are six resource classes supported, as follows:
- OCF (Open Cluster Framework): extension of the LSB conventions for init scripts and is t:he most preferred resource class for use in the cluster
- LSB (Linux Standard Base):standard Linux init scripts
- Systemd: systemd command
- Fencing: fencing-related resources
- Service: mixed cluster where nodes use the systemd, upstart, and lsb commands
- Nagios: Nagios plugins
OCF is the standard resource class in cluster and by far the most common.
Default resource stickiness defines where a resource should go after the original situation is restored. You can define that resource migrate back to original node or you can define the resource stays where it currently is running. Latter is recommended as in a cluster you should try to avoid migration of resources as much as possible.
Constraints
A constraint is a set of rules that defines how resources (groups) should be loaded.
Constraint Types:
- Location: A location constraint defines on which server a resource should be loaded ( or never be loades, with negative priorities)
- Colocation: A colocation constraint is used to define what specific resources should be loaded together or, alternatively, that they should never be loaded together.
- Order: An order constraint is used to define a specific order.
Order constraints are implicit in resource groups, but using order constraints may be more convenient, as you can define these between different types of resources. You could, for example, define that a resource group can only be loaded after some specific primitive has been loaded first.
Scores
When working with constraints, you can define priorities. To define priorities, scores are used. On every constraint, you can use a score from -1,000,000 (-INFINITY = may never happen ) up to INFINITY (1,000,000 = must happen). To express that you never want a certain action to be performed, you can use a negative score. Any score smaller than 0 will ban the resource from a node.
======================================================================================
CheatSheet
All operations on the cluster, including installation and configuration, resource management and messagging are made using one command as root
# pcs
where pcs mean ‘peacemaker configuration system’.
    pcs  status      -   View cluster status.
    pcs  config      -   View and manage cluster configuration.
    pcs  cluster     -   Configure cluster options and nodes.
    pcs  resource    -   Manage cluster resources.
    pcs  stonith     -   Manage fence devices.
    pcs  constraint  -   Manage resource constraints.
    pcs  property    -   Manage pacemaker properties.
    pcs  node        -   Manage cluster nodes.
    pcs  quorum      -   Manage cluster quorum settings.
    pcs  alert       -   Manage pacemaker alerts.
    pcs  pcsd        -   Manage pcs daemon.
    pcs  acl         -   Manage pacemaker access control lists.
    pcs  qdevice     -   Manage quorum device provider on the local host.
    pcs  booth       -   Manage booth (cluster ticket manager).
For details see also PCS command reference manual
An alternative is using the pcsd Web User Interface to the url:
https://<server-ip>:2224/
with the same features and abilities as the command-line based pcs utility. Login with hacluster user and password
Cluster Installation and Configuration
packages installation:
# yum install pcs -y
# yum install fence-agents-all -y
# echo CHANGE_ME | passwd --stdin hacluster
# systemctl start pcsd
# systemctl enable pcsd
authenticate nodes:
# pcs cluster auth \
	node1.example.com node2.example.com node3.example.com
Username: hacluster
Password:
node2.example.com: Authorized
node1.example.com: Authorized
node3.example.com: Authorized
create and start new cluster:
# pcs cluster setup <option> <member> ...
for example
#  pcs cluster setup --start --enable --name mycluster \
	node1.example.com node2.example.com node3.example.com
Create a cluster
pcs cluster setup [--start] [--local] --name _cluster_ name_ _node1_ [_node2_] [...]
Enable cluster service (autoboot):
# pcs cluster enable --all
Enable cluster service on node[s]
# pcs cluster enable [--all] [node] [...]
Disable cluster service on node[s]
# pcs cluster disable [--all] [node] [...]
check cluster status:
# pcs status
# pcs config

# pcs cluster status
# pcs quorum status
# pcs resource show
# crm_verify -L -V

# crm_mon
(crm_mon is a live monitor for crmd)
destroy cluster
# pcs cluster destroy <cluster>
start/stop cluster
# pcs cluster start --all
# pcs cluster stop --all
start/stop node
# pcs cluster start <node>
# pcs cluster stop <node>
Start the cluster
# pcs cluster start [--all] [node] [...]
Stop the cluster
# pcs cluster stop [--all] [node] [...]
Forcebly stop cluster service on a node
# pcs cluster kill
mantainance of a node
# pcs cluster standby  <node>
# pcs cluster unstandby  <node>
Put node in standby
# pcs cluster standby <node1>
Remove node from standby
# pcs cluster unstandby <node1>
Set cluster property
# pcs property set <property>=<value>
disable fencing
For develepmont and testing until devices are configured (not in production!!):
# pcs property set stonith-enabled=false
firewalld config
If firewall is enabled (but is better disable):
 # firewall-cmd --permanent --add-service=high-availability
 # firewall-cmd --reload
Add New Node
On all nodes:
check hacluster user and password
# systemctl status pcsd
On an active node:
# pcs cluster auth rh7-nodo3.localdomain
# pcs cluster node add rh7-nodo3.localdomain
On the new node
# pcs cluster start
# pcs cluster enable
Display the configuration in xml style
# pcs cluster cib
Display the current status
# pcs status
Display the current cluster status
# pcs cluster status
Destroy/remove cluster configuration on a node
# pcs cluster destroy [--all]
Cluster node authentication
# pcs cluster auth [node] [...]
Add a node to cluster
# pcs cluster node add [node]
Remove a node to cluster
# pcs cluster node remove [node]
RESOURCES
Resources and services are managed using
# pcs resource
relocate, enable and disable service groups:
# pcs resource move <resource>
or
# pcs resource relocate <resource>
to move back
# pcs resource clear <resource>
resource allocation and movement can also be affected by setting up constraints.
# pcs contraint <type> <option>
Resource creation
# pcs resource create <resource_name> <resource_type> <resource_options>
To create resources, you need resource agents (RAs). A resource agent is like a service load script.
list of ocf subclasses (resource type):
# pcs resource list heartbeat
for example resource type
- ocf:heartbeat:IPaddr2
- ocf:heartbeat:LVM
- ocf:heartbeat:Filesystem
- ocf:heartbeat:oracle
- ocf:heartbeat:apache
options detail of a resource type or agent:
# pcs resource describe <resource_type>
Es. resource creation (vip)
 # pcs resource describe ocf:heartbeat:IPaddr2
 # pcs resource create vip_cluster ocf:heartbeat:IPaddr2 ip=192.168.100.1 --group myservices
 # pcs resource create apache-ip ocf:heartbeat:IPaddr2 ip=10.0.2.50 cidr_netmask=24

 # pcs resource show
TROUBLESHOOT
journalctl
tail -f /var/log/messages
tail -f /var/log/cluster/corosync.log
 # pcs resource debug-start  <resource>
 # pcs resource debug-stop  <resource>
 # pcs resource debug-monitor  <resource>
 # pcs resource failcount show  <resource>
resource update
update configuration or correct config errors:
# pcs resource update <resource> <options>
to reset failcount:
# pcs resource cleanup <resource>
to move resource offf a node:
# pcs resource move <resource> [ <node> ]
to start a resource (or group):
# pcs resource enable <resource>
to stop a resource (or group):
# pcs resource disable <resource>
GROUPS
create group and add a new resource:
# pcs resource create <resource_name> <resource_type> <resource_options> --group <group>
delete resource
# pcs resource delete <resource>
add a resource in a group
 # pcs resource group add <group> <resource>
 # pcs resource group list
 # pcs resource list
CONSTRAINTS
A constraint is a set of rules that defines how resources (groups) should be loaded.
add constraint to groups:
 # pcs constraint colocation add apache-group with ftp-group -10000
 # pcs constraint order apache-group then ftp-group
If a resource is migrated off from a node using move will enforce constraints -INFINITY on original node. You may have to use pcs resource clear to remove the constraint
reset constraint on a resource ( or group):
# pcs resource clear <resource>
Resource command examples:
 # pcs resource cleanup g_ora_db1

 # pcs resource clear g_mysql
 # pcs resource clear g_ora_db1

 # pcs resource create vip_db1 ocf:heartbeat:IPaddr2 <options>
 # pcs resource create vg_db1 ocf:heartbeat:LVM  <options>
 # pcs resource create fs_db1 ocf:heartbeat:Filesystem <options>
 # pcs resource create ora_db1 ocf:heartbeat:oracle <options>
 # pcs resource create lsnr_db1 ocf:heartbeat:oralsnr <options>

 # pcs resource create vip_db1 ocf:heartbeat:IPaddr2 ip=192.168.8.190 --group g_ora_db1
 # pcs resource create vg_db1 ocf:heartbeat:LVM volgrpname=vg_db1 exclusive=true --group g_ora_db1 --group g_ora_db1
 # pcs resource create fs_db1 ocf:heartbeat:Filesystem device=/dev/vg_db1/lv_db1 directory=/db1 fstype=ext4 --group g_ora_db1
 # pcs resource create ora_db1 ocf:heartbeat:oracle home=/ora_db1/oracle/11.2.0.4 monpassword=rhclumon monprofile=rhcluprofile monuser=RHCLUMON sid=db1 user=oradb1 --group g_ora_db1
 # pcs resource create lsnr_db1 ocf:heartbeat:oralsnr home=/ora_db1/oracle/12.1 listener=LISTDB1 sid=DB1 tns_admin=/ora_db1/oracle/12.1/network/admin --group g_ora_db1

 # pcs resource delete vip_ora_db1

 # pcs resource describe Ipaddr2
 # pcs resource describe mysql

 # pcs resource disable vip_ora_db1
 # pcs resource enable g_ora_db1

 # pcs resource group add g_ora_db1 vip_db1 --before ora_db1
 # pcs resource group remove g_ora_db1 ora_db1

 # pcs resource move g_mysql
 # pcs resource move g_ora_db1

 # pcs resource status
 # pcs resource show
 # pcs resource show db_mysql
 # pcs resource show lsnr_db1 --full

 # pcs resource manage g_ora_db1
 # pcs resource unmanage g_ora_db1

 # pcs resource update ora_db1 sid=db1
Resource manipulation
List Resource Agent (RA) classes
# pcs resource standards
List available RAs
# pcs resource agents ocf
# pcs resource agents lsb
# pcs resource agents service
# pcs resource agents stonith
# pcs resource agents
Filter by provider
# pcs resource agents ocf:pacemaker
List RA info
# pcs resource describe RA
# pcs resource describe ocf:heartbeat:RA
Create a resource
# pcs resource create ClusterIP IPaddr2 ip=192.168.0.120 cidr_netmask=32
 params ip=192.168.122.120 cidr_netmask=32 op monitor interval=30s
The standard and provider (ocf:heartbeat) are determined automatically since IPaddr2 is unique. The monitor operation is automatically created based on the agent's metadata.
Delete a resource
# pcs resource delete resourceid
Display a resource
# pcs resource show
# pcs resource show ClusterIP
Start a resource
# pcs resource enable ClusterIP
Stop a resource
# pcs resource disable ClusterIP
Remove a resource
# pcs resource delete ClusterIP
Modify a resource
# pcs resource update ClusterIP clusterip_hash=sourceip
Delete parameters for a given resource
# pcs resource update ClusterIP ip=192.168.0.98
List the current resource defaults
# pcs resource rsc default
Set resource defaults
# pcs resource rsc defaults resource-stickiness=100
List the current operation defaults
# pcs resource op defaults
Set operation defaults
# pcs resource op defaults timeout=240s
Set Colocation
# pcs constraint colocation add ClusterIP with WebSite INFINITY
With roles
# pcs constraint colocation add Started AnotherIP with Master WebSite INFINITY
Set ordering
# pcs constraint order ClusterIP then WebSite
With roles:
# pcs constraint order promote WebSite then start AnotherIP
Set preferred location
# pcs constraint location WebSite prefers <node1>=50
With roles:
# pcs constraint location WebSite rule role=master 50 \#uname eq <node1>
Move resources
# pcs resource move WebSite <node1>
# pcs resource clear WebSite
A resource can also be moved away from a given node:
# pcs resource ban Website pcmk-2
Moving a resource sets a stickyness to -INF to a given node until unmoved
Also, pcs deals with constraints differently. These can be manipulated by the command above as well as the following and others
# pcs constraint list --full
# pcs constraint remove cli-ban-Website-on-pcmk-1
Set a resource failure threshold
# pcs resource meta RA migration-threshold=3
Move default resource failure threshold
# pcs resource meta default migration-threshold=3
Show a resource failure count
pcs resource failcount show RA
Reset a resource failure count
pcs resource failcount reset RA
Create a clone
# pcs resource clone ClusterIP globally-unique=true clone-max=2 clone-node-max=2
To manage a resource
pcs resource manage RA
To UNmanage a resource
pcs resource unmanage RA
STONITH
ADD FENCING DEVICE
# ipmitool  -H  rh7-nodo1-irmc  -U admin -P password power on
# fence_ipmilan --ip=rh7-nodo1-irmc.localdomain --username=admin --password=password --action=status
Status: ON

# pcs stonith
# pcs stonith describe fence_ipmilan
# pcs stonith create ipmi-fencing1 fence_ipmilan \
	pcmk_host_list="rh7-nodo1.localdomain" \
	ipaddr=192.168.10.225  \
	login=admin passwd=password  \
	op monitor interval=60s
( pcmk_host_list list of machines controlled by this device ) check and enable
# pcs  stonith
# pcs property set stonith-enabled=true
# pcs stonith fence  pcmk-2
# stonith_admin --reboot pcmk-2
Display fencing resources
# pcs stonith show
pcs treats STONITH devices separately.
Display Stonith RA info
# pcs stonith describe fence_ipmilan
List available fence agents
#pcs stonith list
Add a filter to List available resource agents
#pcs stonith list <string>
Setup properties for STONITH
# pcs property set no-quorum-policy=ignore
# pcs property set stonith-action=poweroff     # default is reboot
Create a fencing device
#pcs stonith create stonith-rsa-nodeA fence_rsa action=off ipaddr="nodeA_rsa" login=<user> passwd=<pass> pcmk_host_list=nodeA secure=true
Display fencing devices
#pcs stonith show
Fence a node off
#pcs stonith fence <node>
Modify a fencing device
#pcs stonith update stonithid [options]
Display a fencing device options
#pcs stonith describe <stonith_ra>
Deleting a fencing device
#pcs stonith delete stonithid
=================================================================================
Other operations
Batch changes
# pcs cluster cib drbd_cfg
# pcs -f drbd_cfg resource create WebData ocf:linbit:drbd drbd_resource=wwwdata \
        op monitor interval=60s
# pcs -f drbd_cfg resource master WebDataClone WebData master-max=1 master-node-max=1 \
        clone-max=2 clone-node-max=1 notify=true
# pcs cluster push cib drbd_cfg
=============================================================
References
RedHat documentation:
-
High Availability Add-On Overview https://access.redhat.com/documentation/en-us/red_hat_enterprise_linux/7/html/high_availability_add-on_overview/
-
High Availability Add-On Administration Guide https://access.redhat.com/documentation/en-us/red_hat_enterprise_linux/7/html/high_availability_add-on_administration/
-
High Availability Add-On Reference Manual https://access.redhat.com/documentation/en-us/red_hat_enterprise_linux/7/html/high_availability_add-on_reference/
ClusterLabs documentation:
-
Cluster Quick Start https://clusterlabs.org/quickstart-redhat.html
-
Clusters from Scratch https://clusterlabs.org/pacemaker/doc/en-US/Pacemaker/1.1/html/Clusters_from_Scratch/
-
Pacemaker Explained https://clusterlabs.org/pacemaker/doc/en-US/Pacemaker/1.1/html/Pacemaker_Explained/
-
That Cluster Guy (Developer Blog) https://blog.clusterlabs.org/
Other links:
-
Pacemaker and Corosync https://www.unixarena.com/series/pacemaker-corosync/
-
Understanding High Availability Cluster Architecture https://www.golinuxcloud.com/understanding-high-availability-cluster-architecture/
-
Creating a Linux Cluster in RedHat or CentOS 7 https://theforloop.io/creating-a-linux-cluster-in-red-hatcentos-7/
-
Pacemaker on Linux http://fibrevillage.com/sysadmin/316-pakemaker-on-linux-example-introduction-package-installation-and-preparation